Posts

Week 15: This is why we don't have public 3D printers.

Image
I have not spent too much time working on our group project this week. At home, I have continued to produce 3D printed parts. At Superway I have been asked to get the shops 3D printers up and running. One of the printers has not been operational since I entered Superway last semester. Since I have assembled two 3D printer kits I have a pretty good understanding of their functionality. To further add to this, I have spent quite a bit of time in Marlin (3D printer firmware) and I am very comfortable editing the source code for different printers. Most of my time at Superway this week has been dedicated to getting this finished. Although this means I am not working on the project it is a much needed break. I have spent all of the last weekend working. Standing during all of my shifts has taken a toll on me and spending some time at Superway sitting down is helping me recover. Thankfully, Angelo has taken the lead with finishing up the curved rail sections. Thursday of this week our team m...

Week 13-14: Continuing work on the switch and turn sections

This week is dedicated to rolling more metal. I have continued working on the turn sections and the other switch. The other switch is almost complete! As of right now I have about 100 hours of 3D printing left. The end of the semester is coming quickly and the amount of work we have left is daunting to think about.

Week 12: Finishing up the switch...

Image
Set back after set back..... It turns out that the cad drawing I have been working from in producing the switch had a few incorrect dimensions. The dimensions on this model did not reflect all of the new changes that were made when we switched from a 2 inch to a 1.5 inch rail width. With the new dimensions all written down, I have finally produced and mounted a switch section!

Week 11: Presentation 2

This week we ran out or Aargon gas for our TIG welding at Superway. This is a huge setback for us since we are unable to continue working on our support structure. For my second presentation I focused on discussing our time table for the project. Frankly, I wish we were further along with the project. Every set back hurts our timetable. Regardless, I do feel as if our team has accomplished a lot of work so far. At this point in time I have approximately half of the 3D printing for this project completed. Double dipping working on this project as a group and on my own at home is becoming a daunting task.

Week 10: Trying to make a switch

Image
Given that we now have a reliable way to bend aluminum, I have began attempting to make a switch. Although I haven't completed the entire switch, I do have a portion of it started. Unfortunately, I still need to device a method to attach the straight portion of the switch with the curved rail (the missing rail in the image).

Week 9: Bending 6061 Aluminum

Image
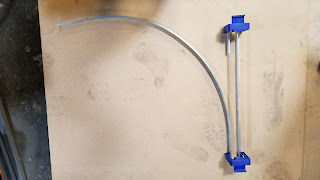
Figuring out how to bend aluminum is proving to be the most stressful part of the project. Looking back, if we had the budget to purchase a series of aluminum that is easier to bend (something like a 3000 or 5000 series aluminum) this aspect would be a lot easier. We chose not to utilize a different series of aluminum due to the high cost of those series of aluminum. On Tuesday, I met with Professor Muntz in hopes of utilizing the school's machine shop to produce new rollers for our ring roller. The idea here was that producing a smaller roller would open up the ring roller and allow us to produce the necessary bends. Muntz instead suggested easier ways to modify our purchased ring roller. His suggestions included grinding away some of the side plate material on the ring roller in hopes of opening up the roller more. Although this worked, the produced rings have a terrible surface finish as the ring roller tears into the aluminum rail. What to do when things go wrong? More researc...

Week 8: Finishing up the support bases

Image
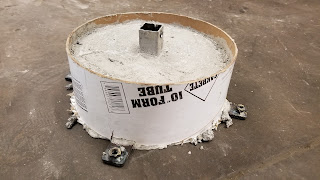
The goal of this week was to finish up our support bases. All of my energy this week went into mixing concrete and pouring them into the molds. At this point in time, it finally is beginning to feel as if we finally have something to show for all the work that we have been putting into the project.

Week 7: Continuing with the support structure

Image
This week Bryan focused his energy on welding our support structure. With him working with the welder, I was able to focus my energy on other aspects of the project. I have spent this work working with our aluminum rail sections. I have been experimenting with the ring roller that we purchased for the project. On our thinner aluminum bar that we are using for the switches third rail it works perfectly. Unfortunately, the ring roller will not open (it's zero position) far enough to roll our aluminum rails for the switches and curves. I will have to further investigate this. I also began mixing concrete for our first few concrete support bases.

Week 6: Support Structure Fabrication and a Linear Rail Section

Image
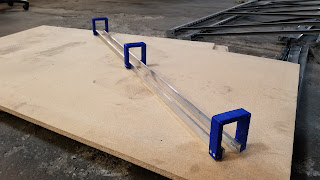
This week we have continued work on the support section. There is still a lot of welding that needs to be accomplished. Along with this, I have went ahead and produced not one but two linear rail sections!

Week 5: Presentations

Our group decided to present this week during the first round of presentations. With the presentations as well as other academic responsibilities we did not get very much fabrication work done this week. Hopefully next week we are able to get the support structure near completed.

Week 4: Start of Support Structure Fabrication

Image
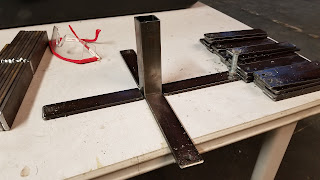
This week has been all about working on the support structure. Our order of aluminum should arrive soon. Prepping the support structure has been rather time consuming. We needed to purchase a new grinding wheel for the grinder in the shop. Every piece needs to be de-burred, drilled and cleaned before they can be welded and finally set in concrete. This is what the current progress is (Before being set in a concrete form) They still need to be welded together. That is our goal for the upcoming weeks.

Week 3: Picking Up Materials and Beginning Manufacturing+

Our square tubing from Gorilla Metals was available for pickup this week! This is great because this allows us to start working on the support structure for the track. Since this was in I went ahead and took the opportunity to pick up all of the other necessary supplies that were available locally. We now have everything we need to begin working on the support structure.

Week 2: Gather Materials

All of the material is beginning to arrive. Our order from McMaster and BoltsDepot arrived within only a few days. The square tubing from Gorilla Metals was put in. Our aluminum rails were ordered from Midwest Steel. With shipping and lead times varying by vendor we are definitely going to have to make some modification to our Gantt chart. Our original goal was to have a lot of our material by the first week of school. The new plan going forward is to work on our support structure first since all of the material for that will arrive the soonest. Immediately after that it'll be time to look into our turn and switch sections. Everything is beginning to come together.

Week 1: Bill of Materials and Budget Approval

This was the week I spent all semester anticipating. Our team was approved for a full budget! We have went ahead and ordered almost everything we need to get the project started. Since our original bill of materials was from over a month again I went ahead and did some more price comparison to help cut costs. The project is beginning to come together.

Week 15 & 16 Final Presentation

The semester has finally come to an end! Our last set of presentations occurred during these two weeks. This semester has been very productive for the small scale track team. I feel really good about the direction we are headed with our design and the progress we have made. I am grateful that the members of my team are willing to put in a little bit of team over the winter intersession to get our project moving forward. Our goal is to stay ahead of the game to lighten our load for the following semester. Happy Holidays!

Week 11-14 Rapid Prototyping

My main focus during our rapid prototyping stage was regarding the 3D printing of the hangar brackets. I took on this challenge since I own a 3D printer and always have access to it. Our design requires 60 hanger brackets to be produced. Each hanger bracket takes 6 hours to print with a 0.4 mm nozzle. I decided to step this up to a 0.8 mm nozzle and I was able to cut print time in half! That is 360 hours of 3D printing down to about 180! This process was not as easy as just switching out the nozzles of the printer. A lot of time went into re-calibrating the printer with the new nozzle and dialing in the correct settings on the slicing software. After multiple failed prints I had found the perfect settings. A reduction in print speed, as well as changes to the nozzle diameter, layer height and infill gap settings were all necessary to produce successful prints.

Weeks 9 & 10: Presentation 2

All of the time working on our design paid off during presentation 2. Presentation 2 gave us an opportunity to showcase our work and receive positive feedback. One of the aspects of our design we have not considered was being able to adjust the angle of our support structure for uneven pavement. This was one of the largest takeaways from this presentation and is something that the twelth scale team will definitely consider going forward.

Weeks 5-8 Focusing on Design

All of my time during weeks 5-8 has been dedicating to designing components for our track as well as minimizing production time. A modular design is proving to be both an asset as well as an inconvenience. Being able to design a track that is modular will ease assembly and disassembly down the road. The time that we can save doing this is extremely important when our project is showcased at Maker Faire. Unfortunately, being modular also requires a few extra components compared to a non-modular design. One of the biggest hurdles to face is time. Each hangar bracket for this project requires about 105 grams of plastic. Initially the print time estimate was 4.5 to 5 hours. Along with working on designing the track I have been focusing on how to reduce this time substantially. To do this I began investigating into utilizing a large nozzle diameter on the 3D printer. Increase the amount of material that flows through the nozzle would reduce the amount of time of the prints. The key is to fi...

Week 4-5: Presentation 1

Presentation 1 gave us an opportunity to showcase our initial design ideas for our small scale track. A lot of time has gone into considering each aspect of the track design along with each component that will need to be designed. One of our main goals is to create a design that is as modular as possible. Along with modularity the design must focus on ease of assembly and production time.

Week 3: Getting Ready to Present

Next week is going to be our first major presentation in the Spartan Superway Project. A lot of information needs to be sorted to make the presentation possible. This week we gained some insight as to how the Futran system works. This gives us a good starting point so that we can begin creating specifications for our railway system.